Set up a Collator Node
This is a step-by-step how-to so you can get your Hydration collator up and running. In this guide, we use Ubuntu 20.04 LTS.
Required technical specifications
The following technical specifications are required as a minimum for running a Hydration collator node:
- OS: Ubuntu 20.04
- CPU: Intel Core i7-7700K @ 4.5Ghz (or equivalent single core performance)
- Memory: 64GB RAM
- Storage: NVMe SSD with a capacity of at least 200GB (the data footprint will grow over time)
These are the minimum technical requirements which have been verified by the team. Want to make sure that your machine has sufficient resources to run a node? Run a performance benchmark to find out.
Create a technical hydra user and add it to Sudoers
sudo adduser hydra
sudo usermod -aG sudo hydra
su - hydra
Download and configure the hydradx binary
Pick a 12.x release, we are using v12.1.0 from our assets repository:
wget https://github.com/galacticcouncil/HydraDX-node/releases/download/v12.1.0/hydradx
sudo mv hydradx /usr/local/bin
sudo chmod +x /usr/local/bin/hydradx
sudo chown hydra:hydra /usr/local/bin/hydradx
Command to run your collator
Best is to run your collator as a service using systemctl. To do so, create a file, namely hydradx-collator.service under /etc/systemd/system/hydradx-collator.service:
sudo vim /etc/systemd/system/hydradx-collator.service
Then paste the following:
[Unit]
Description=hydradx validator
[Service]
Type=exec
User=hydra
ExecStart=/usr/local/bin/hydradx \
    --name YOUR_COLLATOR_NAME \
    --prometheus-external \
    --base-path /var/lib/hydradx \
    --collator \
    -- \
    --execution wasm \
    --telemetry-url "wss://telemetry.hydradx.io:9000/submit/ 0" \
    --base-path /var/lib/hydradx

Restart=always
RestartSec=120
[Install]
WantedBy=multi-user.target
Before starting your node, let's create the base-path folder and give it the necessary permissions and ownership:
mkdir /var/lib/hydradx
chown hydra:hydra /var/lib/hydradx
Make sure you have enough volume for your base-path by using df -h command.
Note that --prometheus-external is optional, but we highly recommend it so you can be able to export prometheus metrics and monitor your node's health through Grafana. For more details about monitoring, please visit this link.
If you need to monitor both the parachain and relaychain metrics, --prometheus-externaloption should be setup in both parts. You also need to set a separate port for the relaychain part as follows: --prometheus-port YOUR_CUSTOM_PORT_NUMBER
Depending on your setup, you might also want to override certain parameters like the websocket, rpc or your node p2p port. Please use hydradx --help for more information about the available options.
After saving your file, run the following commands to start your node:
sudo systemctl enable hydradx-collator
sudo systemctl start hydradx-collator.service
Your node should now be up and running. Make sure your hydra user has the necessary permissions to access your base-path and key file.
If you need to troubleshoot your running service, you can use the journalctl command with the -f option for tailing:
journalctl -fu hydradx-collator
Generate your session key
In order to generate keys for your node, run the following command:
curl -H "Content-Type: application/json" -d '{"id":1, "jsonrpc":"2.0", "method": "author_rotateKeys", "params":[]}' http://localhost:9933
Once done, you will have an output similar to:
{"jsonrpc":"2.0","result":"0x9257c7a88f94f858a6f477743b4180f0c9a0630a1cea85c3f47dc6ca78e503767089bebe02b18765232ecd67b35a7fb18fc3027613840f27aca5a5cc300775391cf298af0f0e0342d0d0d873b1ec703009c6816a471c64b5394267c6fc583c31884ac83d9fed55d5379bbe1579601872ccc577ad044dd449848da1f830dd3e45","id":1}
Set your session key
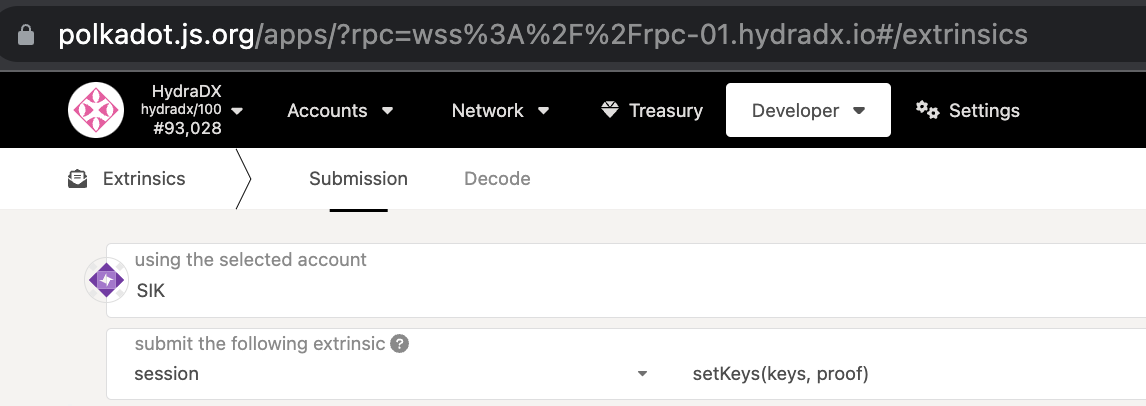
To associate the generated session keys with your Controller account, navigate to the following menu item in the Polkadot/apps on the Polkadot parachain Hydration: Developer > Extrinsics.
Fill in the fields:
- using selected account: select your Controller account;
- submit the following extrinsic: select
sessionon the left side andsetKeyson the right; - keys: enter your session key you just generated;
- proof:
0;

What's next?
Make sure that your node is fully synced. Once this is done, let us know in the dedicated Discord channel (only if you have been preselected as a collator).